UPDATE: 22 November 2008
This post has attracted a lot of comments, and I’ve added new information in the comment stream that does not appear in the main post. The result is a bit jumbled and hard to read for reference purposes. At this time, I am closing comments on this thread, pending a complete re-write that will integrate all information from both the main post and the comments into one. Then I will re-open comments.
In the meantime, please be sure to read through all the comments.
- George
 This post is everything I’ve learned about the 34PICT-3 carburetor, all pulled into one place. Warning: long post with lots of pictures. It is intended to supplant previous posts on the subject and I will update it rather than make new posts when new information comes along.
In the early sixties, VW had a 1300 engine with single-port heads (both cylinders shared an intake port), coupled to a Solex 32PICT carburetor and a Bosch vacuum-advance distributor. (Mind you, this is my memory talking, so don’t bet the rent-money on it.) It was a very successful engine if you weren’t in a hurry, but American buyers wanted more power. VW responded with the 1500 and then 1600 dual-port engines, for which the super-reliable 32PICT carburetor was too small. In many stages thus was born our nemesis, the 34PICT-3 carburetor.
This larger carb was far more complicated and was almost big enough for the engine. Really, VW should have gone with a 2bbl carb, but I was ten years old at the time so for some reason they didn’t seek me out to ask my opinion.

I currently have a 1600 DP engine with a 34PICT-3 carb, and it has been a challenge to get it running right. Fuels have changed (15% alcohol has less oomph per volume, so needs to be mixed differently) and modern fuels tend to clog the jets with lacquer condensates. My car ran very badly and I was determined to correct it.
The 34PICT-3 really needs a longer advance curve, so you can begin with a  dual-advance distributor (having both a mechanical- and vacuum-advance component.) This is broadly known as a ‘Mexican taxicab distributor’ and Aircooled.net has a modified one they call the SVDA. They have the advance cam reground to their own specs and specify a different timing setting that eliminates the flat-spot on the 34PICT-3. It’s a good distributor.
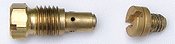
Be sure to use a fuel-block (shown) to connect the vacuum outlet on the left side of the carb to the vacuum advance. This is simply a metal tube bent in such a way as to prevent fuel from ever running down into the vacuum-advance can on the distributor and ruining the diaphram therein.
Also, get rid of your points. Install a Pertronix or Compufire and forget about the crappy Bosch points adjusters. (I always liked GM’s system – you could adjust the points using a dwell meter and a hex wrench with the engine running. So simple!)
Notice the bright red intake manifold section boots. I think they’re made of silicone or polyurethane or something besides rubber. They are far more resistent to cracking than the old rubber ones.
I use copper ignition wires with Bosch 1K ohm plug ends, but that’s just me. You might do fine with fancy fiberglass-core wires. I assume you are using the right spark plugs for your engine – the ones that came with my engine were wrong.
 Next the jets in the carb need to be changed. They are a bit lean to begin with, even assuming pure gasoline. Your boxer engine likes the fuel mixture a bit rich. I couldn’t find a new Solex carb, so I’m using a Bocar 34PICT-3 carb, and I installed a 130 main jet, and a 55 idle jet. Remember on the 34PICT-3 the idle jet affects drivability and power up to about 2,000 rpm when the main jet takes over. In other words, it’s extremely crucial for in-town driving. This helped a lot.
I think the original idle jet was a 50, but the replacement jet orifices (orifii?) were visibly larger in the new jets than the old ones.
 One repeating problem I had was blown needle valves. If you turn the carb upside down you should not be able to blow air (lips on fuel intake – do NOT use compressed air) into the float chamber. I’d adjust the fuel pressure by stacking gaskets under the fuel pump (which is the official method from the VW service manual) but the needle valve would still go.
The symptom was that the car would run rough, smell of gas, plugs would foul, and adjusting the air idle screw would make little difference. (This is very bad for the engine, by the way.) Gas mileage was terrible. I finally reckoned that the nominal fuel pressure was probably going sky-high when the engine compartment got hot. Between the fuel pump and the filter, that’s a lot of volume to expand and alcohol has a high coefficient of expansion. I carry a spare needle valve now – they’re only about five bucks.
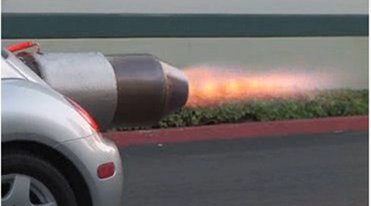
The pressure solution was two-fold. First, get all unnecessary fuel components out of the engine compartment. You don’t want a large reservoir of fuel inside there getting hot during operation. There is also a safety reason for this. Once in a while the weight of the filter bouncing along on the line will work the brass fuel intake out of the carb, with flaming results. This has never happened to me, but I have seen pictures.

In this picture, you are looking straight down behind the left side of the engine between the oil cooler exhaust and the #3 cylinder. The steel fuel line enters the engine compartment (wrapped in an insulating cotton sleeve made from the hem of an old t-shirt) and turns upward along the front of the engine shroud, and bends across. It is best to use a tubing bender for this operation. Just four inches of rubber flex line remain between the steel line and the carb. The steel line is held in place by a magnetic network cable clamp, which works great.
Notice at left there is an elaborate pass-through for the steel line through the front tin. I enlarged the hole to accomodate a rubber sleeve around the steel line, and it is held in place by fender washers and clamps. Maybe I am just being overly fussy, but I don’t want the sheet metal rubbing through the steel fuel line. I don’t want it rattling, either.
I suggest two fuel filters; one under the gas tank, and one in the transmission compartment. You don’t want any crud going in the carb. (There is another source of jet-clogging; we’ll get to that in a minute).
Second, regulate the fuel pressure to about 1.5 lbs/in2. I tried one of the old Ford-type adjustable regulators, and it worked fine until it sprung a leak and blew gas all over the place. This was corrected by retorquing the screws around the circumference but it was unnerving all the same. Also note that the markings on the regulator are completely inaccurate. 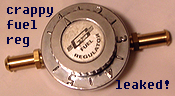 Use a fuel-pressure gauge to adjust your pressure.
After the gas-spewing incident (and calming down, no harm was done), I got a Holly low-pressure regulator. (Specify low-pressure: it also comes in a higher-pressure model that you don’t want.) It is well-made and has two outputs which is nice if you ever decide to go with dual carbs.
The regulator comes with a mounting bracket which can be screwed to a firewall, and then you screw the regulator to the bracket. I made a little secondary bracket out of some sheet metal and riveted it into the transmission well, then simply hook the regulator bracket in (with a piece of inner-tube to prevent rattling) and put a zip-tie on to hold it in place. Anytime I want to service the regulator, I can just cut the zip-tie and slide it out.
The Holly regulator is set with a hex screw at one end opposite the intake; the farther in you screw it, the higher the pressure. Notice in the picture how far out I had to screw it to get a low enough pressure. Then you lock it in place with the locknut.
I gave up on mechanical fuel pumps. It was so easy to mount an electric pump. This one was rather cheap – someday I’ll get a totally silent rotary pump to replace it. One nice thing about an electric pump is that it will fill your float bowl in a few seconds without having to crank the car.
In this picture you are looking up into the transmission well (with the driver’s side heater-duct removed). The clutch lever is visible at lower-right. At lower-left is the cheap electric fuel pump. Fuel from the frame fuel line (large loop of flex line) enters the pump at bottom – mounted as low as possible so if I am parked pointing downhill and am low on gas the pump will ‘grab’ OK). Then to the fuel pressure regulator at center, and out to the fuel filter at right and into the engine. If any of these components malfunctions, they will leak fuel onto the nice, cool, non-sparky transmission rather than onto the hot, electrically sparking engine. Not visible in this picture is a plastic mud-guard fashioned from a plastic jug and held in place by strong magnets. The wires and hoses have been neatened up a bit since this picture was taken – I don’t like stuff flopping around, but I don’t like it held too rigidly either.
The second fuel filter is mounted in place with a ‘bracket’ consisting of a bit of plastic from a 2-litre bottle, molded with a heat-gun around a filter, and secured by two powerful magnets from an old computer hard drive. This makes it easy to swap out the filter anytime (except for the inconvenience of crawling under the car). I use ramps for that – they are safer than jacking up the car.
Note that with an electric pump, and with the Pertronix magnetic pickup, you don’t want to sit there with the ignition on but the engine not running for more than a few seconds. Wire your radio accordingly.
To adjust the 34PICT-3 is different from previous models. On earlier carbs, the adjusting screw on the throttle arm set the idle speed; on the 34PICT-3, it only sets the butterfly valve closing clearance. You want about four thousandths of an inch clearance along the outer edge of the butterfly valve when it is in the closed position. Do this by backing out the throttle arm screw until it just touches the lowest part of the choke cam, then turning it back in about ½ turns. The main thing is so the butterfly valve doesn’t “stick” in the closed position. Once this adjustment is made, you never have to set it again.
Engine running, valves adjusted, timing set: now adjust the idle speed using the great big screw on the left side of the venturi. This is the ‘air-idle adjusting screw’ and it passes air, not fuel. Set your idle to about 850 rpm. Then turn the little fuel-idle adjusting screw below it clockwise until the rpm just begins to drop, then back it out about ½ to ¾ turns. Then fine-adjust the idle with the air-idle screw again. Repeat three or four times with the engine really warmed up to get it perfect.
A word about air cleaners. I really like the oil-bath cleaner that VW used to use. If you live in a volcano zone (like my brother does), it’s really the only cleaner to have and generally I just think they’re neat. But for some reason my oil-bath cleaner wouldn’t clear my Scat powder-coated shroud – go figure; German car, Chinese shroud, 40 years apart…
Anyway I got a new Mexican VW air cleaner with a paper element and it fits perfectly. It is an original VW part and well made but notice how it sits at a goofy angle. I’m always wanting to straighten it out. I still miss the oil-bath cleaner. Damn modern innovations…
Now on to the other cause of clogging. I tried every gas under the sun but the jets would still clog. A friend of mine who knows about fuels explains: modern fuels are formulated for fuel-injected engines. The fuel is piped to an injector under tremendous pressure. The injector is screwed into a blazing-hot cylinder head, so the fuel doesn’t evaporate until it is well clear of the injector.
Now put that same fuel in a carbureted engine. The fuel is under zero pressure in a float bowl. The venturi effect sucks the hot fuel through tiny jets, which are ice-cold (sometimes literally). So in the confined space inside the jet the fuel drops 80 degrees in a fraction of a second and the additives precipitate out as lacquer just inside the jet.
My car would get to idling crappy and performing badly; I’d remove the jets and soak them in carburetor cleaner and ‘Vroooom! it would run great… for about a week. (Be sure not to neglect the tiny little trim jet just to the rear of the idle jet on the right-hand side of the carb – it has a really small opening.) Using an old product called “Seafoam” – as needed – fixed the clogging.
Heat management; notice the heat risers on the intake manifold are wrapped in fiberglass. I want them to warm the intake manifold, not the engine compartment. I also wrapped the muffler in fiberglass which reduces the heat in the engine compartment considerably, and I put a cotton sock (secured with bailing wire) over the oil pump filter to insulate it from the heat of the muffler and blowing off the left 2 cylinders’ fins.
Obviously a lot of the stuff in this post is beneficial no matter what carby you have. I’m sure there’s more and like I said, as I try new stuff, I’ll come back and update this post. I’ll start a new fuel post only if I go to dual carbs, and there’s lots of other stuff I want to do before messing with that.

 Last thing I did with the VW was begin work on the interior. It involved quite minor lateral forces on my fingers – not much more than when I’m weightlifting or riding my bike, but my hands have been hurting more and after that I couldn’t even sign my name. Immersion in ice water for a half hour helped a lot but didn’t help the general physical discomfort of doing body work or restoration work on the interior. It isn’t arthritis or carpal tunnel, it’s just the latest wrinkle in fibromyalgia.
  A Snap-On 3/4” deep-well socket found in a rusty toolbox in a trash pile, combined with a Plumb 6-inch extension found in the gutter while out walking one night, plus the handle to the old useless Bilstein jack, makes just about the best lug-wrench I’ve ever used. Price is right, too.
 It will idle either at high RPM’s or not at all. It’s embarrassing, not to mention uneconomical, polluting, and unsafe. It’s very bad for the engine itself.